Showing posts with label Prima Marketing Inc. Show all posts

Sunday, 29 April 2018

Mysterious

Hello and welcome back to my poor neglected blog, it has been months since I was last here. Today I am back with a mixed media art journal page.
 
Over on the Viva Las VegaStamps blog they have a month challenge and April is all about being inspired by not only the image below, but also "Be inspired by words like nature, natural, trees, forests, camping, mountains, skies & water, fishing, birds, reflections, boats, dogs, gray, tan, white & black, gray + anything else that you might be inspired by!"
 
One rule that you absolutely must follow is that your project must include at least ONE if not MORE stamps from vlvstamps.
 
This is the image for the April Challenge.
 
I used three stamps from plate 1471, which was released April 2016
 
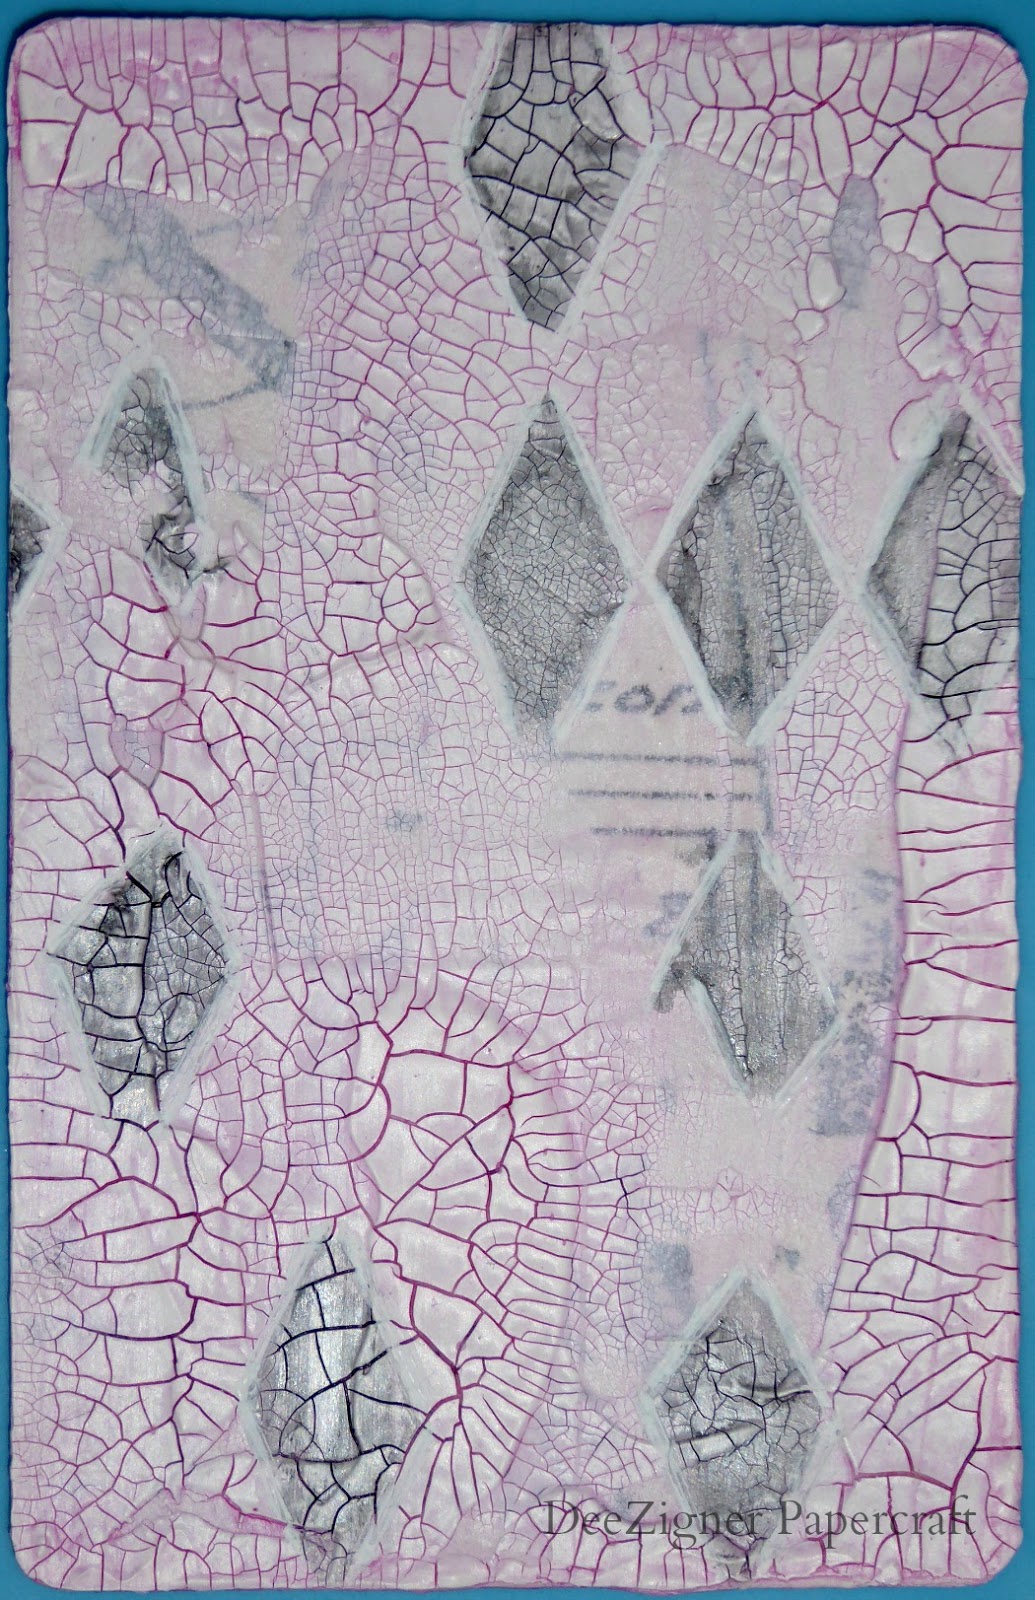
This is my finished art journal page.
The way that the inspiration board inspired me was firstly all the different textures that you would find if you were actually standing looking at the scene in real life. The second way was what different shapes that you would find in nature and naturally I gravitated towards the circle even though there isn't one in the board. Circles are my favourite shape and appears in nature so often.
I kept my colour palette pretty neutral with the pop of teal to bring the page to life.
 
I gave my art journal page the title of mysterious because mother nature is pretty mysterious and so can be the creative process.
 
Below are some more phots of some of the different stages of my art journal page an close ups


products used: golden fluid acrylics - carbon black and teal, prima art basics heavy gesso - white, prima art extravagance texture paste - white crackle, stabilo all - black, archival ink - jet black and watering can, liquitex - matte gel, faber-castell tri graphite pencil 2B
 
Happy Creating

Friday, 27 October 2017

Blossum, Bloom, Grow

I love playing with new products and this last week I got to play with a relatively new product from Faber-Castell, colour fizz tablets. They are included in the Shop and Crop Scrapbooking September Mixed Media Mania Kit, which is still available in the shop.


If you would like to see how I created this canvas and used the colour fizz tablets then please pop on over to the Shop and Crop Scrapbooking Blog to follow along with my tutorial.

Happy Creating

Thursday, 27 July 2017

Choose To Shine

I am really enjoying creating the Artsy Circles, I think I am stepping out of my comfort zone, still no idea what my style is but that's ok, I don't need to know.

So the prompt for today is Butterflies. I love butterflies, along with tulips they are my most favourite things. In saying that you would not believe the trouble I had creating the circle for today. First I was looking for something that I thought I had thrown out and in the end I had just transferred it to another draw, 1/2 an hour I spent looking and then it wasn't right. Secondly, after I realise that what I thought was a good idea and it wasn't I then spent ages going through all my stamps and stencils to find what I did have.

Finally I created a circle that I am really, really happy with.


I started off with a piece of heavy water colour paper that I put through my bigshot with a circle die that has a diameter of 10.4 cm, which I then put gesso on both sides.

For my background colour I mixed clear gesso with Frank Garcia artisan powder and applied it with my palate knife, making sure that I had texture and not just an all over colour.

Making sure that the gesso layer was dry with my archival ink and stamp I added another layer.

It is all about layers, through a stencil I added some paint in a contrasting colour.

Next I added white gesso to just tie it altogether, then I got out my stabilo all pencil to grunge it up.


Ok so this is where I forgot to take photos as I was very involved in my creative process. Once I made it grungy, I then stamped the butterflies all over the surface making sure that they were going in different directions and that I had some flying off the page and flying on to the page. I then scraped another light layer of white gesso over my stamping. Using my stabilo all to grunge it up some more. Finally I added my white circle, embossed the image, used my stabilo all to grunge it up again. Lastly I added the three quotes.


products found at Art and Soul Studio
archival ink - jet black
art alchemy acrylic paint - black berry
Frank Garcia - artisan powder - french sage
kaisercraft stamp - sketchy

Happy Creating

Monday, 10 July 2017

They Know The Way

Good Morning,
 
Have you seen the challenge that Shop and Crop Scrapbooking have running? If not here is a link to the post on the blog, where you will find lots of inspiration from the Design Team. To enter you need to belong to our Facebook group and add your creation into the correct album. You have until the end of the month to do so.
 
The challenge is a mood board
 
 
How much fun can you have with this, we would love to see what you create.
 
I took my inspiration from the colour palette and the quote and created a journal page. Here are some close up of the texture I was able to create. If you would like to see my process then please pop on over to Shop and Crop Scrapbooking Blog (see link above).


products used that can be found in the shop:
 
I hope that you play along
Happy Creating
 

Sunday, 9 July 2017

Book Pages

It's Artsy Circle day today which means the Art and Soul Studio and the affiliated facebook group Soul Sisters have a new prompt.

The prompt for today is book pages. Now I know this can cause some people to shudder when they think about people ripping a book and if this is you please still play along but find a piece of cardstock that looks like a book page. I have an old text book that is filled with Shakespeare's plays that I brought from an op shop for $5, I am sure it will last me a life time.


I started with a piece of heavy watercolour paper that I cut with my metal circle die through my bigshot. The circle is 10.3cm in diameter which I have then put gesso on both sides.

I decided that I was going to cover the surface of my paper with the book page, at first I was going to run it through my bigshot but I vetoed that idea. I put glue on my watercolour paper and then put it straight down onto the book page. Once dry, well what I thought was dry I torn the rest of the page away from the edge of the circle. To make sure that the paper was well attached I used my brayer over the top and bottom.

I let it sit overnight because I had no idea where I was going with this. I thought about drawing on it and actually went ahead and started, that was a complete disaster. I tried to erase my light pencil marks but I torn the page. Once the page was torn I could actually remove the book page from the watercolour paper. The glue wasn't dry, I don't know if this was because I used a glue stick on gesso. So my background on my actual complete circle is different from this picture because I put a new piece book paper down. This time attaching it with matte medium. Using a paint brush I put the matte medium on to my circle then the circle straight on to my book page.

I wanted a garden on my book page. Why you ask? I have no idea its just what I wanted. Looking through my large stash of stamp I found one that I like and knew would work for the idea I had in my head. When stamping I didn't want a dark or perfect image, so I had sure that I stamped on a scrap piece of paper first. Also I had never used this particular stamp from the set so I seasoned it with my ink first.

Once I found the stamp I was going to use I knew that I had some rub-ons that went with this stamp and that is what I used for the middle flower image and dragonfly.

I am not really sure where I was going with the gesso but I went with the flow and ended up with a smaller image but you could still see some of the image underneath.

Using my inktense pencils I coloured my image but I wanted the middle flower to stand out from the rest. I didn't want to use gesso so I was at first a little bit stumped but then I had a brain wave of using my artisan powders from Prima to dull the image. I painted the powder over all of my circle and once I was happy with the colour I then recoloured the middle flower. I also used another colour of my artisan powders on the gesso. I like these powders as they have no shimmer. I didn't put them on very heavy so they are really hard to see but they are there.

products used that can be found in the shop
Prima Artisan Powder - vintage ivory and trianon patina
Derwent Inktense Pencils - beach green, burnt orange, deep violet and deep rose

Happy Creating

Sunday, 11 June 2017

Live In The Moment

Today over on the Shop and Crop Scrapbooking Blog you will find a layout and an art journal page.  I am not sure that I love either of them but I know I have fun creating them.


The two of them couldn't be more different if you would like to see a the complete pages please follow the link to Shop and Crop Scrapbooking.

The products below can be all found in the Shop. If you would like to purchase any of them please use the code DO5 for a discount

My Mind's Eye - Hooray,
TCW - Light & Fluffy Modeling Paste
Chartreuse Iridescent Creative Medium,
Colour Blast Shimmer Pot Water Colours - Snow White and Royalty,
Lindy's Stamp Gang Magicals Freaky Franken-Lime and Witch's Potion Purple,
Dusty Attic Stencil - Circuit,
Tim Holtz Collection Layering Stencil - Stripes
Archival Ink - Jet Black

Happy Creating

Saturday, 13 May 2017

Art and Soul Studio

Today is the a good day for an adventure to begin. My very first post for Art and Soul Studio (blog and shop) is live. I am a part of a pretty amazing and talented team.

This set of tags came about because I had just brought tracksuits pants for the winter school uniform for my two. The tags were just too good to throw away.

I love creating layers and I these tags have 5 layers. Creating layers always involves getting messy especially when you paint with your fingers.

If you would like to know how I created my three tags the please pop on over to the blog where you will find a photographic tutorial.

products used: liquitex gesso - clear, tim holtz idea-ology - small talk, archival ink - jet black, versamark - watermark stamp pad, dina wakley media paint - penny, tangerine, ruby and night, paperartsy seth apter stamp - esa02, dina wakely media stamp - silhouetted women, ranger embossing powder - clear, versa colour - rose red, kaisercraft stamp - script, faber-castell pitt pen big brush - black, prima marketing stencil - grungy grid (all items available in the shop are highlighted pink)

Happy Creating

Friday, 7 April 2017

Rusty Gears

The Rust Effect Paste trio by Prima Marketing have been my stash for a little while, but it wasn't until I went on retreat last month that I actually played with it. It was a lot of fun to play with.

In using up some of the gelli plate prints that I created in June last year I made a background that I really, really didn't want to cover up. I just loved all the texture and colours that I was able to achieve.


A brain wave hit, I could use gears because they had holes in them, even though I wasn't going to cover the whole background you would be able to see through the gears.


So now not only do I have yummy texture on the background but also on the gears thanks to the texture paste.


 products used: cogs from my stash, art extravagance rust effect paste - gold rust, brown rust & red rust, art extravagance texture paste - graphite, dylusion paints - vibrant turquoise, fresh lime and lemon zest, gelli arts printing plate, the crafter workshop stencil mini corncob etching, kaisercraft mini alpha stickers - chocolate & white, stabilo all - black, faber-castell pitt artist pen big brush - nougat, derivan matisse flow - raw umber, golden mediums - acrylic glazing liquid gloss, mixed media paper, art basics 3d gloss gel - transparent.

Happy Creating

Thursday, 6 April 2017

Follow Your Dreams

Currently I have 5 bound art journals being used and 2 just patiently waiting for me to break them out, but I really love using mixed media paper or heavy watercolour paper that I have cut up myself.  Having all these different size journals and paper lets me just follow my journey where ever it leads.

The art journal page I am sharing with you today has a little story behind it which I hope you don't mind me sharing with you. It started out as a page painted with black gesso, then letter stickers stuck down. Once this was all dry I added colour with my Twinkling H2Os, which were pretty in colour but the design was ugly. I put it aside for another day. That day final came and then after many, many, many layers of thick gesso, texture paste, I was able to cover the old page up. My piece of mixed media paper that is 21.5 cm x 21.5 cm now weighs 64g. The same size and kind of paper with nothing on it only weighs 13g, that's a lot of product to cover something up.

Much happier with the new page


products used: mixed media paper, art basics heavy gesso - white, lindy's stamp gang sprays starburst - tiffanylou blue, blue hawaiian blue, lindy's stamp gang sprays flat fabio - tilt-a-wheel teal, tim holtz collection layering stencil - stripes, uni pin fine line - black 0.1, kaisercraft rubons - dreams, indigoblu stamp - limor circles, dina wakley media stamp - textures

Happy Creating

Tuesday, 7 March 2017

Mixed Media Magic Retreat

Two days ago I came home from a long weekend (4 days) filled with creativity. Thursday afternoon I arrived and from then on the weekend was jam packed with creating, laughter, food and friendship (new and old).

The retreat was organised by Cindy from A Scrappe Tiger , thanks Cindy. Now on retreat you can do as much or as little as you like, we had options of doing classes, and I did 6. Four extremely talented artists took the time out of their schedule to come and share their talent, knowledge and creativity with us and they were Fiona Paltridge (blog), Louise Nelson (blog), Michelle Logan (blog) and Cindy Porter (blog).

I am not going to share with you today any of my class work that's for another day. Please bare with me as I need to tell a little story behind my art work before I share.

When the class list came out, there was a couple of classes that I decided not to do and one of them was by Fiona and it was called "The Way Things Fall", after reading the description it still didn't really tickle my fancy. Then I gave myself a kick up the bum and a talking too. Fiona is one of my most favourite artists (which I am lucky enough to be able to call a friend) so why would I not do her class. So I did and I have to say oh my I LOVED that class.

When looking at the class requirements is said that we could bring special trinkets or findings that we had stashed away. I knew I had plenty of those, who doesn't.

 
Are you wondering what it is, it does look a bit strange. It is a piece of paper that has cotton string wrapped around and inside it. Then they have been put into a rust bath. When I was talking to Fiona about these pieces of paper (I had two) I worked out that they have to be at least 13 years old. I have been married 11 yrs this year and I know that I created this before I met my husband. They have gone through 5 moves and finally I was able to use one of them.

Hope you are still with me to actually see my art work.


I thought it needed something else but I didn't want to add anything else to it, and two very wise women told me, "if I think it's finished then it is". "Its your art work, doesn't matter what others think", "Now you just need to sign it" which I am yet to do

A close up of some of that yummy texture


products used: art basics heavy gesso - white, paper, cotton string.

Happy Creating

Monday, 30 January 2017

A = Art

There are so many talented artists out in the world and I do have a few favourites that I follow. One of my favourites is Marta Lapkowska (blog, facebook, Instagram), at the end of last year she started up her own facebook group called Maremi's Creative Café.

It is full of so many talented artists and just recently Marta created a challenge for us. The challenge is either using a deck of playing cards, flash cards or something similar and creating on that size with a theme that is determined by Marta each week. So far we have had the themes of art, bubbles, coffee and this week is dragonflies. You don't have to do each week it is just for fun so do the ones you want. I did find a deck of old playing cards. I prepared two by sanding them to take off the shiny coating on one side and painted a layer of gesso over it. Then they sat on my desk, until this week where I finally I had an idea.


Since taking the above finished photo I have actually changed the place of the quote, it was just in the wrong spot for me. I have moved it a little further right and down a little as well.

products used: prima art extravagance texture paste - white crackle, liquitex matte gel, e-xpress it glue - triple tac, prima art basics heavy gesso - white, derivan matisse flow - magenta (quin violet), faber-castell pitt pen big brush -  cold grey III, mont marte gesso - black, ranger archival ink - jet black, gelly roll pen - white, the crafters workshop stencil - mini harlequin, adornit wooded shapes, muslin, derivan spreader medium, tim holtz idea-ology tissue wrap - melange.

Happy Creating

Tuesday, 29 September 2015

Adventures with Color Bloom Spray Mists

Just recently I finally gave in an brought the Color Bloom Spray Mists from Prima. My will had been strong until I put my name down for a class that is happening in November. In the class the sprays will be used. So me being me I needed to know what they were like and what they did if you would like to read what my ramblings were then please pop on over to Off The Rails Scrapbooking

Products Used: Color Bloom Spray Mist -  Soft Teal, Brush Chrome, Deep Teal, Tangerine, Summer Sky and Cobalt. Mixed Media Paper, TCW Stencil - Mini HalfTone Circles, Clear Crackle Paste, Clear Gesso, Texture Paste, White Gesso, Matte Gel and Gloss Gel.

Clear Crackle Paste

Clear Gesso

Texture Paste

Gesso

Matte Gel

Gel Medium
Gloss Medium
Gloss Medium

I have created some really yummy back grounds that I cannot wait to use for mixed media cards.

Happy Creating