I love playing with new products and this last week I got to play with a relatively new product from Faber-Castell, colour fizz tablets. They are included in the Shop and Crop Scrapbooking September Mixed Media Mania Kit, which is still available in the shop.
If you would like to see how I created this canvas and used the colour fizz tablets then please pop on over to the Shop and Crop Scrapbooking Blog to follow along with my tutorial.
Happy Creating
Showing posts with label Faber Castell. Show all posts
Friday, 27 October 2017
Saturday, 15 July 2017
You Have To Believe
Lately I have been struggling with my inner art demons, they are telling me that what I create is not good enough. They are telling me that I should give up and choose another hobby. Sometimes it is hard not listen to them when they are very, very loud. Most times I am able to turn then off, but lately it's been rather difficult. This morning I put them back in their sound proof box and proved to them and me I am good enough. I think I created one of my favourite pieces that I have ever made. It is an art journal page that I created for Art and Soul Studio.
Here are some close ups, if you would like to see the entire page and my process please follow the link to the blog.
Happy Creating
Here are some close ups, if you would like to see the entire page and my process please follow the link to the blog.
Happy Creating
Monday, 30 January 2017
A = Art
There are so many talented artists out in the world and I do have a few favourites that I follow. One of my favourites is Marta Lapkowska (blog, facebook, Instagram), at the end of last year she started up her own facebook group called Maremi's Creative Café.
It is full of so many talented artists and just recently Marta created a challenge for us. The challenge is either using a deck of playing cards, flash cards or something similar and creating on that size with a theme that is determined by Marta each week. So far we have had the themes of art, bubbles, coffee and this week is dragonflies. You don't have to do each week it is just for fun so do the ones you want. I did find a deck of old playing cards. I prepared two by sanding them to take off the shiny coating on one side and painted a layer of gesso over it. Then they sat on my desk, until this week where I finally I had an idea.
Since taking the above finished photo I have actually changed the place of the quote, it was just in the wrong spot for me. I have moved it a little further right and down a little as well.
products used: prima art extravagance texture paste - white crackle, liquitex matte gel, e-xpress it glue - triple tac, prima art basics heavy gesso - white, derivan matisse flow - magenta (quin violet), faber-castell pitt pen big brush - cold grey III, mont marte gesso - black, ranger archival ink - jet black, gelly roll pen - white, the crafters workshop stencil - mini harlequin, adornit wooded shapes, muslin, derivan spreader medium, tim holtz idea-ology tissue wrap - melange.
Happy Creating
Friday, 8 April 2016
Kraft+, Black and White
There are times when you cannot go past a challenge and the new challenge at Kraft+ is one of those times. Kraft+ have a different challenge each month but there is one criteria that must be followed each and every single time, your design must be created on a kraft base.
The challenge is Black & White, this month there is also a kraft board to help with the inspiration.
When I first looked at the kraft board what caught my eye were the polka dots. I didn't use polka dots but they did give me my starting point. The circles also caught my eye and I just love circles.
I couldn't just stop at one card for this challenge I had to create two.
Products used: kraft, dylusions paint - black, die cut circles, kaisercraft wooden flourish guitar, distress paint - black soot, faber-castell big brush pen - black, gelly roll - white, stampin' up - stars framelits dies and dusty attic stencil - criss cross.
Products used: stampin' up stamp - flower shop, stampin' up punch - pansy, faber-castell whipped spackle, the crafters workshop stencil - mini tiny circles, twiddleybitz chipboard - chicken mesh wire, versamark, archival ink - jet black, stampin' up emboss powder - black, tim holtz idea-ology - big chat, charms creations - heavenly hearts and cheese cloth.
Happy Creating
Tuesday, 1 March 2016
Cheeky
This month at Show Us Your Stuff the challenge is a sketch. I wanted to do create a card or a journal page because I just don't do layouts, but in the end I gave in and created one.
I kept putting off creating it as I just had no idea what I was going to do. Then I had no choice but to leave it till the end of the month as we had a huge rain fall that according to the news it was a 1 in 100 year storm and the rain came in the window of my creative space. I then had to empty a lot of my stuff out first to dry the carpet, which lucky didn't take long and then while it was all out I decided that I really needed to go through it all. Stuff has be either thrown out, give to my children's school for art or kept. I still haven't completely finished but i am certainly a lot happier with the way things are organised.
Ooops got a little side tracked there, sorry about that. Getting back to the challenge, I really am very happy with how my layout turned out. My hand made item would be the journal circle which was very simply die cut and the edge inked. I did colour the stars and heat emboss them which changed the chipboard.
The sponsor for this challenge is Rainbow Splendour please pop on over and say hi to Chloe and her design team. The robot and rocket ship can be purchased from there.
I hope that you are inspired by the sketch and enter the challenge.
Products used: die cut circles, orange thread, chipboard stars, whipped spackle, decoart stencil - short circuit, distress inks - festive berries, mowed lawn and salty ocean, ranger embossing powder, lindy's stamp gang magical - freaky franken-lime, faber-castell - fine pitt pen black and big brush deep scarlet red.
Happy Creating
Monday, 18 January 2016
A Gift
A couple of years ago a friend of mine moved house and she has an amazing creative space and is extremely talented, which she will deny. I am lucky enough to get to create in it. Well when she moved she lost her mojo so a group of her creative friends decided that we would each create something for her to hang in her space.
I hadnt seen her for a little while so at the time I could not share what I created for her.
Her favourite colours are pink, aqua, teal, turquoise and green. So I decide to use my favourite products to create something that was unique for her.
Products used: Golden - Fluid Acrylics, Derivan Matisse - Flow, Faber-Castell - Pitt Pens and The Crafters Workshop - Stencils, crackle medium, rubons, Prima Art Basics - 3D Gloss Gel Transparent.
Happy Creating
Saturday, 9 January 2016
And So The Adventure Begins
For the last two and a bit years I have been on the design team and admin team at Off The Rails Scrapbooking and at the end of the month I will be leaving OTRS. It is with a heavy heart and much sadness and a lot of soul searching to make the decision . I have learnt so much, been inspired by so many talented people. Thank you Amanda for giving me the opportunities that you have.
But before I do actually go I have a tutorial to share with you all. Please pop on over to the blog to see how I used the current mood board for my tutorial.
Happy Creating
But before I do actually go I have a tutorial to share with you all. Please pop on over to the blog to see how I used the current mood board for my tutorial.
Happy Creating
Friday, 1 January 2016
I Have Been Keeping a Secret
Since the end of November I have been keeping a secret and I am now able to share it and I am really really excited.
I have been lucky enough to join the design team for the challenge blog Show Us Your Stuff.
Show Us Your Stuff is a blog devoted to all things Handmade. You can enter a layout, project life page, card or Off The Page but it must have at least one handmade or hand dyed embellishment.
Shall I share with you the first challenge of 2016?
This mood board is so gorgeous, so much inspiration can be had. What caught my eye was the red and white umbrella, the sand and the blue of the sea.
And this is what i turned that inspiration into
Products used: Art Basics - Heavy Gesso, Faber-Castell Pitt artist pen big brush - Cobalt Blue, Nougat, Deep Scarlet Red, Faber-Castell Gelato - Blueberry, Cotton Candy, Snow Cone, Silver Ice, Faber-Castell Glass Bead Glitter Gel, Lindy's Stamp Gang Magical - Cafe au lait, Tim Holtz - Idea-ology Small Talk. Everybody has there favourite adhesive mine is Express It TripleTac Glue.
My hand-made embellishments are the umbrella that I drew and fussy cut out of corrugated cardboard and then painted white with gesso and red with my big brush pen. The thongs are are hand drawn and cut out using cardstock then I found a piece of patterned scrapbooking paper to give it the pattern.
Please remember to follow the link at the top of the post to visit Show Us Your Stuff to see who else is on the amazingly talented team and to find more inspiration for the gorgeous mood board.
Happy Creating
I have been lucky enough to join the design team for the challenge blog Show Us Your Stuff.
Show Us Your Stuff is a blog devoted to all things Handmade. You can enter a layout, project life page, card or Off The Page but it must have at least one handmade or hand dyed embellishment.
Shall I share with you the first challenge of 2016?
This mood board is so gorgeous, so much inspiration can be had. What caught my eye was the red and white umbrella, the sand and the blue of the sea.
And this is what i turned that inspiration into
I had so much fun creating this card and it actually turned out the way I pictured in my head and that doesn't happen very often.
Products used: Art Basics - Heavy Gesso, Faber-Castell Pitt artist pen big brush - Cobalt Blue, Nougat, Deep Scarlet Red, Faber-Castell Gelato - Blueberry, Cotton Candy, Snow Cone, Silver Ice, Faber-Castell Glass Bead Glitter Gel, Lindy's Stamp Gang Magical - Cafe au lait, Tim Holtz - Idea-ology Small Talk. Everybody has there favourite adhesive mine is Express It TripleTac Glue.
My hand-made embellishments are the umbrella that I drew and fussy cut out of corrugated cardboard and then painted white with gesso and red with my big brush pen. The thongs are are hand drawn and cut out using cardstock then I found a piece of patterned scrapbooking paper to give it the pattern.
Please remember to follow the link at the top of the post to visit Show Us Your Stuff to see who else is on the amazingly talented team and to find more inspiration for the gorgeous mood board.
Happy Creating
Monday, 3 August 2015
Butterflies and Gold
The challenge this month over at The Mixed Media Card Blog is all about Butterflies with gold as an optional element. Well obviously with my love of butterflies I couldn't go past this challenge.
I am not one to throw things out and in fact if I have left over paint, ink, etc I usually find a journal page or a piece of mixed media paper to use it up on. That's what the background of this card started its life as. I had created another project that used pink paint so I mopped it up with my mixed media paper and in the draw this piece sat until last night.
Pink is not one of my go to colours and I wasn't enthused about using this background but it was there so I used it. To cover up most of the pink I used my palette knife to apply a thin layer of gesso over the surface. I thought to myself this is something that I can now work with.
Using my black archival ink and Prima - Old Town stamp, I set about giving the background some depth before I stuck down my embellishments. Deciding this wasn't enough I used some texture paste that I mixed with Viva Precious Metal Colour - Orange Yellow and stencilled it through my The Crafter Workshop - 6x6 Mini Cofffe Splotch. I thought adding the Viva Precious Metal Colour to the texture paste it would come out a pale gold colour. I was mistaken, once dry it was a mustard yellow colour which was not nice at all. By this stage the texture paste was dry and was not going to be removed without destroying what I already had done. So out I pulled my container that held my trusty Faber-Castell Big Brush Pens and coloured the texture paste.
Once I was happy with my background I gave it some more rough treatement by using my distress tool on the edges of the paper. I stuck down my doily, gauze, my stamped and gold heat embossed image from the Prima Rust & Dust Set and finally my butterflies.
My butterflies were created by painting Viva Precious Metal Colour on normal white cardstock then using my Martha Stewart Butterfly punch. To finish of the butterflies I rubbed my Blood Orange Gelato over the top and went around the edge with my big brush pen.
Happy Creating
I am not one to throw things out and in fact if I have left over paint, ink, etc I usually find a journal page or a piece of mixed media paper to use it up on. That's what the background of this card started its life as. I had created another project that used pink paint so I mopped it up with my mixed media paper and in the draw this piece sat until last night.
Pink is not one of my go to colours and I wasn't enthused about using this background but it was there so I used it. To cover up most of the pink I used my palette knife to apply a thin layer of gesso over the surface. I thought to myself this is something that I can now work with.
Just recently I had seen some printed tissue paper that was black with white as the accent colour. I thought it to be quite unusual because normally it is the other way around. To use that as inspiration I found a white doily, cut it in half and painted it with black gesso, I then gently sanded it to give the black paint a distressed look. I added further white detail with my white Gelly Roll pen.
Using my black archival ink and Prima - Old Town stamp, I set about giving the background some depth before I stuck down my embellishments. Deciding this wasn't enough I used some texture paste that I mixed with Viva Precious Metal Colour - Orange Yellow and stencilled it through my The Crafter Workshop - 6x6 Mini Cofffe Splotch. I thought adding the Viva Precious Metal Colour to the texture paste it would come out a pale gold colour. I was mistaken, once dry it was a mustard yellow colour which was not nice at all. By this stage the texture paste was dry and was not going to be removed without destroying what I already had done. So out I pulled my container that held my trusty Faber-Castell Big Brush Pens and coloured the texture paste.
Once I was happy with my background I gave it some more rough treatement by using my distress tool on the edges of the paper. I stuck down my doily, gauze, my stamped and gold heat embossed image from the Prima Rust & Dust Set and finally my butterflies.
My butterflies were created by painting Viva Precious Metal Colour on normal white cardstock then using my Martha Stewart Butterfly punch. To finish of the butterflies I rubbed my Blood Orange Gelato over the top and went around the edge with my big brush pen.
Happy Creating
Saturday, 25 July 2015
Collect Beautiful Moments
I am a very quiet crafter, I like the silence around me. I never normally have any music going, the very odd occasion I turn it on but it doesn't last long. So going on retreat was quite an experience with all the noises around me, but in saying that I am very good in tuning it all out. You have to do that when you are a mother to a 7 year girl and 5 year old boy (as I am typing, they are beginning to argue). While taking in all the sounds which included laughter, talking, machines I picked up my art journal to create a page.
Products Used: Art Journal, Black Gesso, White Gesso, Masking Tape, Stampin' Up Butterfly Punch, Martha Stewart Butterfly Punch, Stabilo - All, Faber-Castell Pitt Pen: Big Brush Cobalt Green, Tim Holtz: Idea-ology Small Talk.
The Small Talk from Tim Holtz was just the perfect quote to add to my journal, because that is exactly what I was doing.
Happy Creating
Happy Creating
Wednesday, 1 July 2015
The Strength Within
This month over at Off The Rails Scrapbooking there are two mood boards to choose from.
When I first saw the two totally different mood boards I was immediately drawn to the top one as my favourite flower are tulips. But when it actually came down to the creating side of things I was inspired by the pink, grey and white of the second one. Pastel colours are not really my thing so I am not too sure what drew me to it.
I always say that I never know what I am going to create and this time was no exception. I didn't even really thing about what I was doing I just did it. It is way outside of what I normally create. Do I love it unsure, I do like it though.
Happy Creating
Thursday, 11 June 2015
Discolouration at Let's Get Arty
This month at Let's Get Arty they have a challenge that I found a little tricky I really had to put my thinking cap on, but I think I did it justice.
For the challenge you had to use Discolouration. I needed to make a colour strong and then reduce the pigment so it was faded and stained. The perfect product to achieve this look were my distress inks.
I used a Stampin' Up punch to create the flower which I then coloured with my gelatos and big brush pen. The stem is hand draw again with a big brush pen.
I never have any idea how my designs are going to turn, this one is simple but effective. The pop of red against the browns really works.
Happy Creating
For the challenge you had to use Discolouration. I needed to make a colour strong and then reduce the pigment so it was faded and stained. The perfect product to achieve this look were my distress inks.
The photos above are the start of my process. I first covered my mixed media paper with Vintage Photo ink, using the ink pad straight onto the paper. The second photo is after I have wiped it back. I did this stage a couple of times trying to get the desired result.
The photos below are my final back ground. I did the process in the above photos and rub the ink off but not quite as much and then I splashed water, and added a little bit of archival ink around the edges and then the heat embossed image in the middle.
I used a Stampin' Up punch to create the flower which I then coloured with my gelatos and big brush pen. The stem is hand draw again with a big brush pen.
I never have any idea how my designs are going to turn, this one is simple but effective. The pop of red against the browns really works.
Happy Creating
Thursday, 4 June 2015
Winter has Set In
Winter has begun here in Geelong, apparently it is the coldest start to winter since 1949. Gee thanks mother nature, when will summer be back. This cold, wet and rainy weather is the perfect time to spend in my space.
With all this time spent in my creative space I am quick of the mark this month and have created a card to enter into the June Challenge over on the ARTastic Challenge Blog. The art work they have used this month is by Luka Va titled 'Bird King'
I used all of these elements and turned them into the card below.
Products Used - Dylusions Paint (Vibrant Turquoise & Squeezed Orange), Faber-Castell Gelatos (Chocolate, Cinnamon, Gold Champagne & Blueberry), Faber-Castell Big Brush Pen (Cold Grey) Stampin' Up Ink (Smoky Slate), Stampin' Up Stamp (Hardwood), Stampin' Up Cardstock (Whisper White) Texture Paste, Mixed Media Paper, MME Cut &Paste Enamel Dots.
Happy Creating
With all this time spent in my creative space I am quick of the mark this month and have created a card to enter into the June Challenge over on the ARTastic Challenge Blog. The art work they have used this month is by Luka Va titled 'Bird King'
Along with using the art as inspiration you must also include wood veneer and/or birds. Not only was I able to find a bird within my stash but it was made out of wood veneer, could not have more perfect. Now what to do with it.
The humming bird on the left is what it originally looked like and the one on the right is what I did to it. I pulled out my gelatos and started experimenting. I first used 2 different browns and it just didn't look right, so I added gold to the mixed and still I wasn't thrilled with the look. My next move was a bold one, I found my blueberry gelato and started to colour. The result is this gorgeous teal colour.
The colours of the art work that stood out to me were the orange of the beak, aqua on the wings and the teal of one of the small birds. The other elements that stood out to me was the wood grain in the back ground and the triangles on the chest of the large bird.
I used all of these elements and turned them into the card below.
Products Used - Dylusions Paint (Vibrant Turquoise & Squeezed Orange), Faber-Castell Gelatos (Chocolate, Cinnamon, Gold Champagne & Blueberry), Faber-Castell Big Brush Pen (Cold Grey) Stampin' Up Ink (Smoky Slate), Stampin' Up Stamp (Hardwood), Stampin' Up Cardstock (Whisper White) Texture Paste, Mixed Media Paper, MME Cut &Paste Enamel Dots.
Happy Creating
Wednesday, 27 May 2015
Love You To The Moon
There is nothing like leaving it to the last couple of days to enter a challenge, but here I am doing it.
I am entering the current challenge (May) at ARTastic Challenge Blog. For the challenges they provided a piece of art to be used as inspiration and this month it is from Sarah Beetson titled - Return of The Young Prince. The required criteria is that you must use Stars.
Every night when I kiss my daughter good night I always tell her that I love you to the moon and beyond and she always answers the same
I am entering the current challenge (May) at ARTastic Challenge Blog. For the challenges they provided a piece of art to be used as inspiration and this month it is from Sarah Beetson titled - Return of The Young Prince. The required criteria is that you must use Stars.
I loved the blue of the background and the Prince's eyes, they are what stood out to me most along with the oh so colourful stars. Below is the card that I created using the piece of art as inspiration.
Every night when I kiss my daughter good night I always tell her that I love you to the moon and beyond and she always answers the same
Products Used:
- Stampin' Up Star Stencil
- Texture Paste
- Blue Water Colour Paint
- Sand paper
- Big Brush Pen
- Indigo Blue Mega-Flakes
- Mixed Media Paper
- Stampin' Up Black Cardstock
- White POSCA Paint Pen
- Stampin' Up Stars Framelits Dies
Happy Creating.
Wednesday, 20 May 2015
Playing Around
I had this idea in my head that I wanted to do but first I thought it would be a good idea to trial it first. Did it work how I wanted it to? No where close, but I am reasonable happy with the canvas. It's not something that I have done before. And it's probably not something I will do again. I am glad that I gave it ago though.
I always say to myself that Art is an adventure and you never know where you are going to end up, just enjoy the journey along the way.
Products used: 10 x 9.5 cm canvas, watercolour paints, gesso, texture paste, Faber-Castel Pitt Pens
Happy Creating
I always say to myself that Art is an adventure and you never know where you are going to end up, just enjoy the journey along the way.
Happy Creating
Saturday, 16 May 2015
Where Flowers Bloom
A couple of weeks ago I was invited to a friends place for a creative play. I had no idea what to take so I did ask for some advice from a group on fb and the suggestions were fantastic but I still was confused. In the end I took pre gessoed timber boards, most of my stencils (and I have quite a few), gesso, a few stamps, heat gun, printed tissue paper, embossing powder and my gel medium.
I really had no plans of what I was going to create. In the end started creating a back ground and an idea started forming in my head.
This was the background I created at my friend's place and below is the finished piece.
Happy Creating
Friday, 1 May 2015
May Challenge at Off The Rails Scrapbooking
Does the mood board above make you want to create? I know it did with me. I love the fact that with mood boards/colour palettes, you don't have to been inspired by everything on it. Take the things that inspire you and run with it.
This month I used the colours, the timber and the saying to create my art journal page. We are our own worst critics and the saying reminds us that there is enough people out there criticising what we do that we don't need to do it to ourselves.
If you would like to see what other members of the Design Team at Off The Rails Scrapbooking create please click HERE.
Happy Creating
Thursday, 19 February 2015
A Mystery No Longer
In my last post (click here) I mentioned that I had a third canvas that was a mystery. Well that is no longer true so I would like to share with you the finished canvas.
Before I share the canvas with you I would like to tell you how the idea came about. I am currently doing an online course with Michelle Grant desiGns. Now Michelle is a super talented artist who is currently one of the Scrapbooking Memories Masters, is on the Kaisercraft Design Team and has been on teams in the past such as Dusty Attic, Donna Salazar and others. The course is called Designed By You and Michelle is sharing her knowledge and talent, and it is really exciting to be a part of.
Last week Michelle had put together a couple of mixed media videos and it involved creating texture. It got me thinking how could I create texture with some of the products that I have here. These canvases are all inspired by those videos, So thank you Michelle for the inspiration, and the journey that you are taking me on.
The photo is not quite a true colour, the canvas is more a little purple rather than the blue that you see. This canvas was done in the same way as the other 2 but I could not see the flower straight away.
When I realised that it was higher up the canvas I knew it needed a stem so I used my Faber-Castell Pitt Big Brush Pens to colour in the stem.
Happy Creating
Tuesday, 17 February 2015
Creating Texture
I love playing with stencils, in fact I think they have become an addiction, but I wanted to create texture on a canvas background with out them. So I assembled the following products on my desk to see what I could create.
Finnabair Art Basics 3D Gloss Gel - Transparent
Golden Fluid Acrylic - Titanium White
Derivan Matisse Flow - Bleached Titanium
Tattered Angels Glimmer Mist - L.E.D. Red
Limor Webber Designs Lindy's Stamp Gang Flat Fabio Spray - Pop Rock Purple
Faber-Castell PITT artist pen big brush - Pink Madder Lake
Faber-Castell PITT artist pen big brush - Magenta
Faber-Castell PITT artist pen big brush - Manganese Violet
Tim Holtz Adirondack Alcohol Ink - Cool Peri
3 10cm x 10cm x 3.3cm canvases
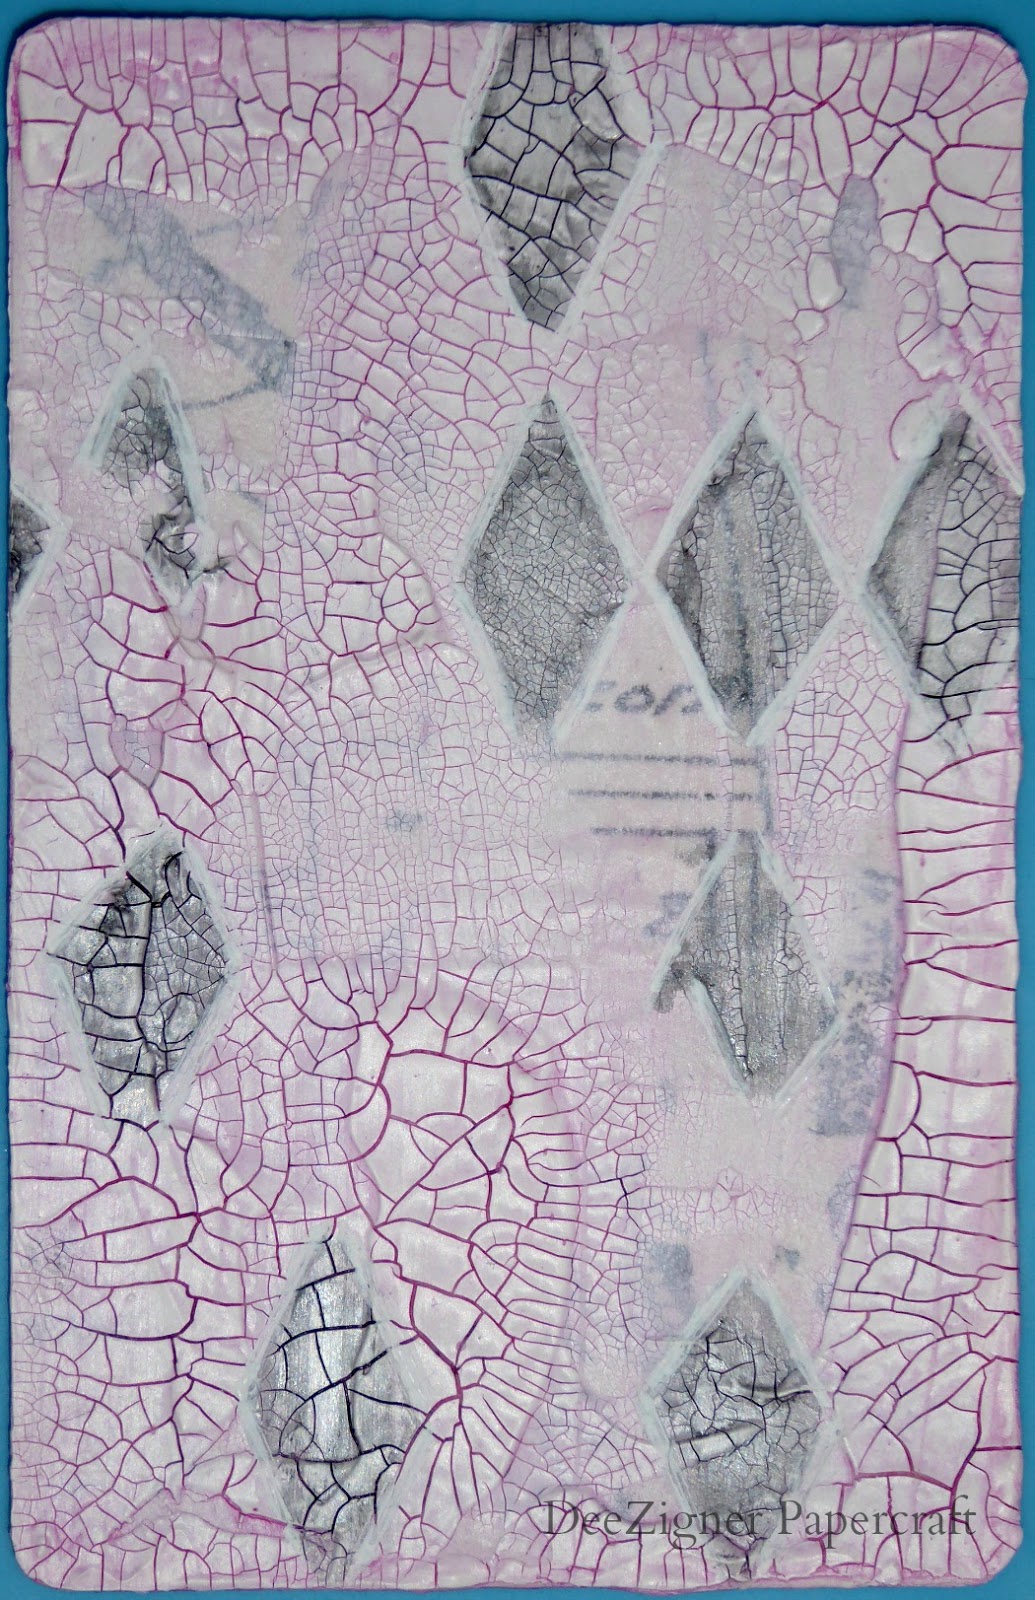
Using my plastic paint scraper I quickly scrapped some of the 3D Gloss Gel on all three canvas. I did it quickly as I did not want them to be the same or perfect. I wanted the bumps, the missed bits and the thin bits.
I picked up two of the canvases and pressed them together. I held them in one hand while I pushed the canvas from the back with my fingers . I then slowly pulled them apart and this amazing texture began to appear. Wondering how I was going to get that texture on the third canvas I again quickly used my paint scrapper to smooth out some of the gel so I could press the 2 canvases together.
Once I had texture on the canvases used my heat gun to dry the gel. At this stage I still had no idea what I was going to create on the canvases as I really was just playing. As I was drying them on two of the surfaces I could see a flower, the third was still a mystery.
Now that the gel was completely dry it was time to use my white paint and a very fine angled paint brush to create the edge of my flower. You can use a grey lead pencil to draw your shape but I found it easy enough using my paint brush. To create the flower I just followed the textural lines made by the gel.
Using the white paint i could clearly see my flower shape, leaving the inside of the flower alone, using my fingers i spread white paint around the rest of the canvas. Taking the top of my Pop Rock purple and L.E.D. Red I used the end of the tube to paint with. I coloured in my flowers, making some parts darker than others. Drying the sprays to speed up the process, and then adding more colour on top. Happy with the coloured sprays I used I them started adding different colours with my PITT pens.
The middle of my purple flower was coloured with the glimmer mist and the middle of my red flower was coloured using my alcohol ink.
The final step was using my fingers to add some unbleached titanium to the canvas.
The middle of my purple flower was coloured with the glimmer mist and the middle of my red flower was coloured using my alcohol ink.
The final step was using my fingers to add some unbleached titanium to the canvas.
Dont be afraid to play with your products, use them different ways because you never know what you could end up creating.
The colours I used came from the current challenge at Off The Rails Scrapbooking.
Happy Creating
The colours I used came from the current challenge at Off The Rails Scrapbooking.
Happy Creating
Wednesday, 30 October 2013
Feathers,keys and hearts
I don't participate in many swaps but just recently I took part in an ATC (Artist Trading Card) Swap. The theme was open, we could do anything that we liked.
Ages ago I brought a packed of ATC size Sticky back canvas and I finally decided to use it. It is wonderful stuff you can do anything to it and it still sticks.
I coloured and stamped the sticky back canvas with distress inks, the piece of material was coloured with dylusion spray inks, the heart was coloured with distress stain, and gelatos and the piece of paper with the quote was also coloured with distress ink. Lots of messy goodness in this ATC.
Happy Creating
Subscribe to:
Posts (Atom)


