I cannot remember the last time I attended the Paperific Expo, it is at least 13 years as I have know my husband that long and I haven't been since I have know him. Last month I was able to go, but it was a little different to what I would normally have done. Normally I would have picked a day, and gone, this time was there for four days and working. Thursday was set up day, got there around 1130 as I had to go after I had dropped my children at school. I was really excited but also nervous as I was meeting Kylie and Darryl Powell who own and run Shop and Crop Scrapbooking. I had spoken to Kylie on the phone and had conversations on facebook and messenger but never actually in person. Its a bit hard when I live in Victoria and she lives in NSW. I also meet the fabulous Donna who is also on the design team.
The weekend was a fantastic, I had an absolute blast. For the weekend I got to talk and meet lots of people, selling products that I love and on the Saturday and Sunday I got messy. I played with Expo Kit No. 4 instead of making a scrapbooking layout I create a canvas. Here is a sneak peak, if you would like to see the complete piece please pop on over to the Blog.
Happy Creating
Sunday, 24 September 2017
Sunday, 10 September 2017
Using Leftovers From A Kit
When we buy a kit there is always leftovers, do you leave them sitting on your desk or in a cupboard because you are not sure what to do with them?
Recently I got to work with a gorgeous kit from Shop and Crop Scrapbooking. With this kit I created a mixed media canvas, click here to see my tutorial on how I created it.
I had so much chipboard and cardstock leftover that I needed to create some more with it. I still have plenty left over after I created a couple of cards, below are a couple of close ups to see the whole cards and tutorial please visit the Shop and Crop Scrapbooking Blog.
Happy Creating
Thursday, 17 August 2017
Day Dream
Just recently I had the pleasure of creating with a Shop and Crop Scrapbooking Kit that was created for the Brisbane Expo by the amazingly talent Elisa.
This is what Elisa designed for the Expo Kit - No. 8 instructions are included for this gorgeous layout.
The kit is jammed packed with lots of goodies to play with. Here is what I designed with the kit. I still have lots of left overs so I look forward to playing and sharing with you again in a couple of weeks.
If you would like to see the whole canvas and the steps on how to create it please follow the link to the Shop and Crop Scrapbooking Blog.
Happy Creating
Saturday, 12 August 2017
Out of the Darkness
This past week was not a great week, and when creating art whether its intentional or not your emotions do come through. Today was my turn up on the Art and Soul Blog and I created a very dark journal page.
If you would like to know how I created this page and the products I used please follow the link above to the Art and Soul Studio blog.
Happy Creating
If you would like to know how I created this page and the products I used please follow the link above to the Art and Soul Studio blog.
Happy Creating
Sunday, 30 July 2017
Stitching
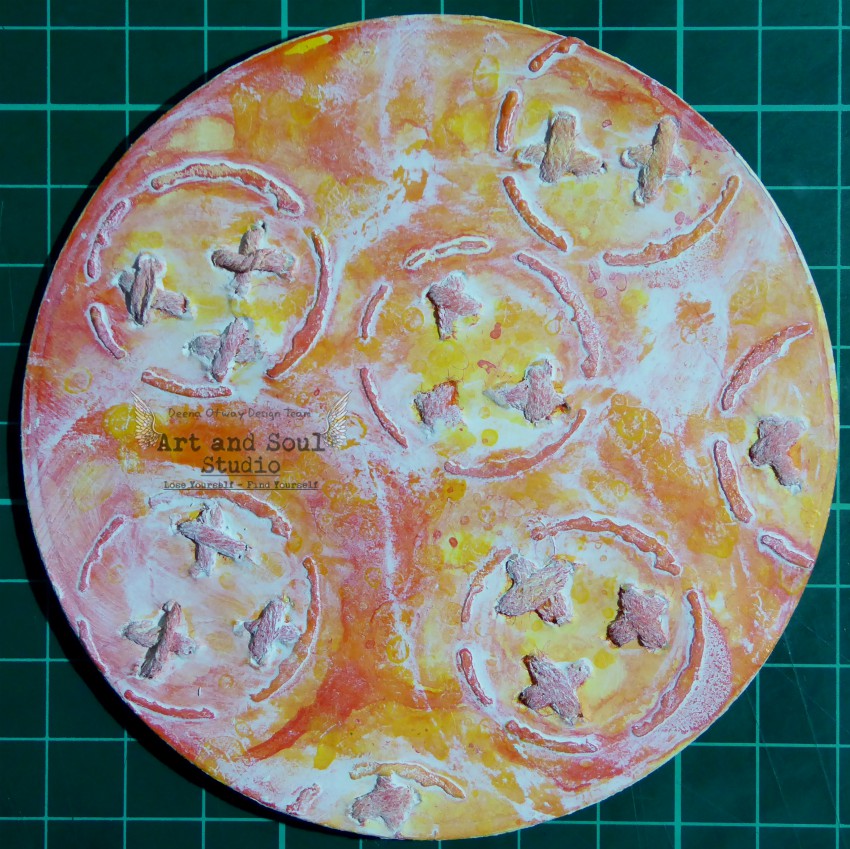
Ever since I can remember I have been doing something creative whether it be mixed media, making cards, cross stitch, painting or drawing. Today's prompt for the Artsy Circles is stitching. So I combined my past love of making crosses with my current love of making mixed media and produced my Artsy Circle for the facebook group Soul Sisters.
I started out with my gesso covered circle. I prepared 6 circles, really should get some more cut and prepared because I am having so much fun.
The next step was using my stencil to create the circles. Once the texture paste dried I then stitched the crosses. I only had two size needles at hand, one was a tiny cotton needle and the other was a tapestry needle. The tiny needle was just too small and the stitching would have not really shown up. The tapestry needle really was too big but I decided to use it any way. I was really disappointed with the holes that it left but as you can see they don't show up on the final piece its just more texture.
Next I added my colour
My final layer for the circle was the gesso, I originally applied it with a palette knife but before it was dried I wiped it away. To apply the gesso I used my fingers.
products that can be found at Art and Soul Studio are listed below
marabu art spray - red orange and lemons
Happy Creating
I started out with my gesso covered circle. I prepared 6 circles, really should get some more cut and prepared because I am having so much fun.
The next step was using my stencil to create the circles. Once the texture paste dried I then stitched the crosses. I only had two size needles at hand, one was a tiny cotton needle and the other was a tapestry needle. The tiny needle was just too small and the stitching would have not really shown up. The tapestry needle really was too big but I decided to use it any way. I was really disappointed with the holes that it left but as you can see they don't show up on the final piece its just more texture.
Next I added my colour
My final layer for the circle was the gesso, I originally applied it with a palette knife but before it was dried I wiped it away. To apply the gesso I used my fingers.
products that can be found at Art and Soul Studio are listed below
marabu art spray - red orange and lemons
Happy Creating
Thursday, 27 July 2017
Choose To Shine
I am really enjoying creating the Artsy Circles, I think I am stepping out of my comfort zone, still no idea what my style is but that's ok, I don't need to know.
So the prompt for today is Butterflies. I love butterflies, along with tulips they are my most favourite things. In saying that you would not believe the trouble I had creating the circle for today. First I was looking for something that I thought I had thrown out and in the end I had just transferred it to another draw, 1/2 an hour I spent looking and then it wasn't right. Secondly, after I realise that what I thought was a good idea and it wasn't I then spent ages going through all my stamps and stencils to find what I did have.
Finally I created a circle that I am really, really happy with.
I started off with a piece of heavy water colour paper that I put through my bigshot with a circle die that has a diameter of 10.4 cm, which I then put gesso on both sides.
For my background colour I mixed clear gesso with Frank Garcia artisan powder and applied it with my palate knife, making sure that I had texture and not just an all over colour.
Making sure that the gesso layer was dry with my archival ink and stamp I added another layer.
It is all about layers, through a stencil I added some paint in a contrasting colour.
Next I added white gesso to just tie it altogether, then I got out my stabilo all pencil to grunge it up.
Ok so this is where I forgot to take photos as I was very involved in my creative process. Once I made it grungy, I then stamped the butterflies all over the surface making sure that they were going in different directions and that I had some flying off the page and flying on to the page. I then scraped another light layer of white gesso over my stamping. Using my stabilo all to grunge it up some more. Finally I added my white circle, embossed the image, used my stabilo all to grunge it up again. Lastly I added the three quotes.
products found at Art and Soul Studio
archival ink - jet black
art alchemy acrylic paint - black berry
Frank Garcia - artisan powder - french sage
kaisercraft stamp - sketchy
Happy Creating
So the prompt for today is Butterflies. I love butterflies, along with tulips they are my most favourite things. In saying that you would not believe the trouble I had creating the circle for today. First I was looking for something that I thought I had thrown out and in the end I had just transferred it to another draw, 1/2 an hour I spent looking and then it wasn't right. Secondly, after I realise that what I thought was a good idea and it wasn't I then spent ages going through all my stamps and stencils to find what I did have.
Finally I created a circle that I am really, really happy with.
I started off with a piece of heavy water colour paper that I put through my bigshot with a circle die that has a diameter of 10.4 cm, which I then put gesso on both sides.
For my background colour I mixed clear gesso with Frank Garcia artisan powder and applied it with my palate knife, making sure that I had texture and not just an all over colour.
Making sure that the gesso layer was dry with my archival ink and stamp I added another layer.
It is all about layers, through a stencil I added some paint in a contrasting colour.
Next I added white gesso to just tie it altogether, then I got out my stabilo all pencil to grunge it up.
Ok so this is where I forgot to take photos as I was very involved in my creative process. Once I made it grungy, I then stamped the butterflies all over the surface making sure that they were going in different directions and that I had some flying off the page and flying on to the page. I then scraped another light layer of white gesso over my stamping. Using my stabilo all to grunge it up some more. Finally I added my white circle, embossed the image, used my stabilo all to grunge it up again. Lastly I added the three quotes.
products found at Art and Soul Studio
archival ink - jet black
art alchemy acrylic paint - black berry
Frank Garcia - artisan powder - french sage
kaisercraft stamp - sketchy
Happy Creating
Tuesday, 25 July 2017
Dreamer of Dreams
Are you a member of the facebook group Soul Sisters? It is affiliated with the shop Art and Soul Studio. The reason I ask this question is that not only is it a wonderfully supportive group but they also have twice weekly prompts to get you creating. The prompts are for a project called Artsy Circles, using the prompt you can create anything that you like as long as the substrate is a circle.
A couple of weeks back the prompt was stencil. I used two, one from The Crafters Workshop - Mini Cubist and another from Scrap Fx - Day Dreamer. I love stencils, for me it is an addiction, that I just cant get over.

In my stash I had some gelli prints that I had done a little while ago. This is what I decided to use as my background. I attached the circle to my print with matte medium.
Once I decide which way I liked the texture of my gelli print I then used my tcw stencil and dina wakley paint to add some colour.
I used versamark ink through my Scrap Fx Stencil so that I could emboss the image. I was so cross with myself as I used some tape to hold down my circle so it didn't move but then I went and ripped the print in two places when I removed the tape. I decided not cover them up, it just adds to the journey the Artsy Circle took me on
Here is a close of the embossed image.
A couple of weeks back the prompt was stencil. I used two, one from The Crafters Workshop - Mini Cubist and another from Scrap Fx - Day Dreamer. I love stencils, for me it is an addiction, that I just cant get over.

In my stash I had some gelli prints that I had done a little while ago. This is what I decided to use as my background. I attached the circle to my print with matte medium.
Once I decide which way I liked the texture of my gelli print I then used my tcw stencil and dina wakley paint to add some colour.
I used versamark ink through my Scrap Fx Stencil so that I could emboss the image. I was so cross with myself as I used some tape to hold down my circle so it didn't move but then I went and ripped the print in two places when I removed the tape. I decided not cover them up, it just adds to the journey the Artsy Circle took me on
Here is a close of the embossed image.
The final step was to attach the words and add a little colour.
Products that can be found in the Art and Soul Studio shop are listed below
dina wakley media heavy body acrylic paint - umber, turquoise, tangerine and ocean
tim holtz idea-ology - metallic stickers
Happy Creating
Subscribe to:
Posts (Atom)